| Configuring
Microsoft Outlook 2003 to use Apex Secure POP3 Email
Follow
these steps to set up Outlook 2003 to check your Apex
email account:
1)
In Outlook, go to the Tools menu, then Email Accounts.
2)
Select the option for "Add a new email account"
and click Next.
3)
Select the "POP3" option and click Next.
4)
Enter in the following fields:
- Your
Name
- Email
Address: yourname@yourdomain.com
- Incoming
mail server (POP3): mail.apex-internet.com
- Outgoing
mail server (POP3): mail.apex-internet.com
- Username:
yourname
- Remember
password: Checked
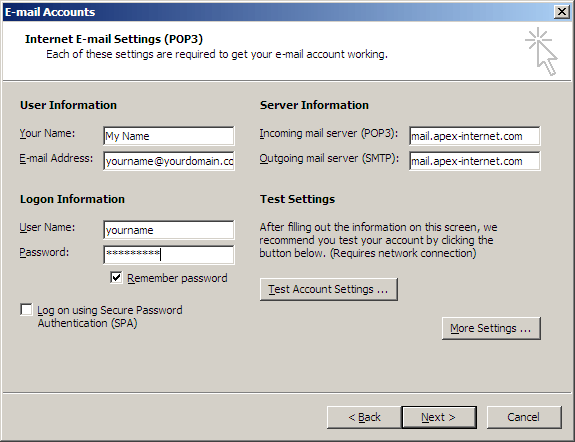
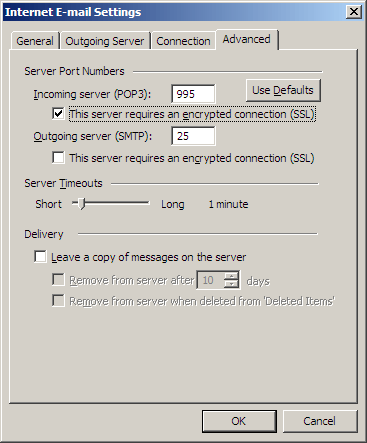
Click
the "More Settings" button and then the
"Advanced" tab. Check the box for "This
server requires an encrypted connection (SSL)".
Click OK.
Click
Next to continue.
5)
Click Finish.
6)
Go to the Tools menu, then to Options. Click on the
"Mail Setup" tab. Make sure "Send messages
immediately when connected" is checked. Do not
click OK yet. Click the "Send/Receive" button
just to the right, and make sure "Schedule an automatic
send/receive every 20 minutes" is checked. You
can specify any number of 20 or less for the number
of minutes. Click Close then OK when finished.
7)
Setup is complete! You can now sent and receive your
email with Outlook. |